Tuesday, October 28, 2008

once a learner, always a learner...


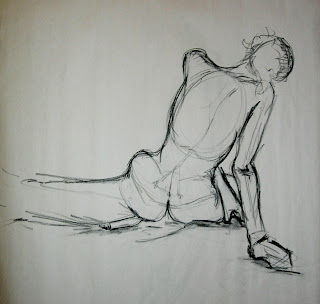
I decided to post two pictures that show how I am always learning. In the picture of just the torso, my first one was too straight and did not show an accurate depiction of the models position. After Amy pointed out my flaw I was able to go back and readjust. For the second drawing we were focusing on learning to foreshorten. This by the way is a tricky thing to learn because your eyes and brain are always in conflict. In the second drawing I had drawn the model on too much of a slope. Once again, Amy was able to show me where the model actually fell on the picture plane and I was able to correct what I had drawn (the correct drawing is in brown).

Always in class, and especially during these drawings I am thinking about one day being the teacher assisting the students. Its a little unnerving to think about because of the what I think were obvious mistakes I failed to see in my two drawings. But then again, I do need to remember I am still in the very beginning of this life drawing learning process and learning takes time. So if I take a step back and commit to memory these feelings and thoughts of being at the beginning of learning something new, that could really help me be a better teacher. I will be able to communicate and instruct more effectively to my students because I will know what they are thinking and feeling. I will be able to genuinely remind them that they are in a learning process and it doesn't happen instantly. One thing that always comforts me in drawing class is when Amy reminds us that this isn't easy and the skill won't come right away. It takes the pressure off during class because you aren't thinking about being the best, but doing your best.

Saturday, October 25, 2008

building from the inside out


In class we did a 40-minute drawing of the skeleton. Once we felt we had the correct proportions of the bone structure we could move on and add the muscles we knew. I found that I moved through drawing the skeleton structure fairly quickly. I was not paying attention to the details, but focused more on getting the basic structure right. When I started adding the muscles it was easy to remember the form of the abdominals on the body, but the legs were more difficult. I found myself utilizing my manikin to recall the leg muscles we built. This allowed me to get the basic structure drawn on my paper, and then Amy was able to help me define the muscles.

I really enjoyed drawing from the skeleton because it was something new. It allowed us to build the body up from the inside out. It is possible to do this with a model, but I am a visual learner and I need information reinforced through visuals. Drawing from the skeleton will help me better understand everything going on under the skin.

Printmaking suggestions


I am starting to sketch out my ideas for my printmaking class. The assignment is we were given three different words and has to create a literal or abstract interpretation of the words. Right now I am approaching the project with both styles, I am showing literal visuals of the words but the composition is more abstract. I have both melancholic and twisted represented, but still need to incorporate consequence. I have some ideas, but want to hear your opinion first before I taint your mind/ideas with my own. Also I would like to hear your thoughts about the rest and what you would improve.

Friday, October 17, 2008

Quads, adductors, and hamstrings


When our blog group was working on these three groups of muscles we were fairly quiet. Here and there we would have questions pertaining to the layering of muscles, the thickness and how far down on the femur they laid. The muscles we had the most issues with were the adductors and adding the hamstrings on top of them. There is so much layering going on in the leg that it is hard to keep it all straight, but it was nice to have three other people to discuss it with. We did not finish attaching all the muscles before the end of class, but I do feel more confident in what I need to do for the rest after having an entire class time to talk with my group.

The process of attaching the clay with these muscles was only slightly different than the rest. I would start out these muscles by rolling out a long "snake" of clay between my hands and then roll it flat with my roller. This made it easier to get a long piece of clay faster versus starting out with the roller on a big hunk of clay. After that the process was the same of cutting out a piece slightly bigger than the picture, attaching the muscle to the manikin and then sculpting it down to fit with my tools.

Thursday, October 16, 2008

Nothing is new


Nothing is new- and even though that is true, when I thought about it, maybe it puts art in a new perspective. Yes as artists we can never really make anything new, but maybe in the end it is not about the final product. Maybe we are missing the bigger picture of art. Maybe in fact it is more for the artist than the viewer. The artist goes through a lot of investigating, researching and staying in touch with the world and from all this, artists learn. Artists grow and develop knowledge about things they may have never investigated if it wasn’t for that one little piece that intrigued them to go further and find out more.
I am experiencing this now in my printmaking class. For our next project, we drew three words out of an envelope. We are suppose to create a piece that represents those three words in some way, shape or form. My three words are melancholic, twisted and consequence. My investigation started out by looking up the definition of all three words using multiple dictionaries. I discovered excellent words such as dislocate, distort, misrepresent, wrenched and corrupted to assist in defining twisted. I thought I would know exactly what consequence’s definition would read, but found importance and relevance as one of the meanings. It is always exciting to look of definitions and discover something so many seem to miss. Words extend beyond much farther than we give them credit. They lead us on chases full of curiosity and wonder. The word melancholic opened up a “can of worms” of information I never knew before. I was under the impression melancholy was simply a state of being depressed, but learned how in medieval times it was considered a serious condition caused by black bile in the spleen. It is connected to a theory called Humorism, which believes that the body has four humors, or substances, that when they are in balance means a person is healthy. When one of the humors gets out of balance, the person’s personality can shift and they show certain characteristics. Black bile is one of the four substances and is believed to lead to melancholy. The information I found went on and on all because I had to look up one word for an art project.
In the end it doesn’t matter so much if my piece doesn’t look the best, or if someone will remember or recognize it because whether any of that happens or not, it cannot take away from the fact that I learned something.

The viewer actually has the harder job of stepping into the artist’s frame of mind and has to figure out what is going on.

“Everything is meaningless,” says the Teacher, “completely meaningless!” What do people get for all their hard work under the sun? Generations come and generations go, but the earth never changes. The sun rises and the sun sets, then hurries around to rise again. The wind blows south, and then turns north. Around and around it goes, blowing in circles. Rivers run into the sea, but the sea is never full. Then the water returns again to the rivers and flows out again to the sea. Everything is wearisome beyond description. No matter how much we see, we are never satisfied. No matter how much we hear, we are not content. History merely repeats itself. It has all been done before. Nothing under the sun is truly new. Sometimes people say, “Here is something new!” But actually it is old; nothing is ever truly new. We don’t remember what happened in the past, and in future generations, no one will remember what we are doing now
Ecclesiastes 1:2-11

Wednesday, October 15, 2008

Glutes


My process in building the glute muscles was very similar to how I built the other muscles. I would study the picture, role out a piece of clay, and then cut out the shape of the muscle bigger than what was shown so I could place it on the manikin and sculpt it to fit. Since we had time to build these muscles in class I would reference the muscle poster on the wall. This poster helped me see how muscles lay on the body and how they interact with one another.

When we were in our blog group we discussed the overlapping of the glutes and how they exist together. The glutes on our manikins did not all look exactly the same so to find out answer we did some more studying of the book pictures and refering to the poster in the room. After studying the photos we had to adjust some layering and the shape of the glutes but were only minimal.

We had some trouble with the tensor fasiace latate and gluteus mximus. The view of tensor fasciae latae and gluteus maximums (iliac head) confusing- shown on different legs in the book. This issue was easily solved by "thinking out loud" and remembering that our manikins only have a right leg!

We double checked the rest of the muscles on our manikins. We compared questionable spots and resolved it in the same manner as before.


Nate asked the question about how we add clay to manikin. We all concluded that we roll out a slab, close to size/ shape of piece- possibly larger so you can subtract from it. Add it to our manikin and sculpt away!

Friday, October 3, 2008

Abdominals


Quadratus Lumborum
Attatchements:
Axial- transverse processes of vertebrae L1 to L4, 12th rib.
Pelvic- posterior iliac crest and iliolumbar ligament.
Actions: extends and laterally flexes the lumbar spine, depresses and stabilizes the 12th rib.

External Obliques
Attatchements:
Axial- outer surfaces of ribs 5 to 12, interdigitating with the Serratus anterior; linea alba.
Pelvic- iliac crest, inguinal ligament.
Actions: flexes the lumbar vertebrae, compresses the abdomen; opposite side rotator of the thoracic vertebrae.

Rectus Abdominis
Attatchements:
Axial- External surfaces of cartilages of ribs 5 to 7, xiphoid process.
Pelvic- pubic symphysis and crest
Actions: flexes the lumbar vertebrae, helps to depress the ribs and compress the abdomen in forced expiration.

Spinal Erectors


Spinalis Cervicis.
Attatchments:
Cranial- spinous processes of vertebrae C2 to C4.
Caudal- Spinous processes of vertebrae C7 to T2.
Action: extends the cervical vertebrae.

Spinalis Capitis.
Attatchements:
Cranial- medical occipital bone between superior and inferior nuchal lines.
Cadual- spinous processes of vertebrae C7 to T1.
Action: Extends the cervical vertebrae and head; laterally flexes and rotates the head.

Spinalis Thoracis
Attatchement:
Cranial- Spinous processes of vertebrae T1 to T8
Caudal- spinous processes of berebrae T11 to L2.
Action: Extends the upper lumbar vertebrae and derotates the thoracic vertebrae.

Longissimus Capitis
Attatchements:
Cranial- dorsal mastoid process
Caudal- transverse processes of vertebrae C4 to T5
Action: extends, laterally flexes the head and cervical vertebrae. Rotates the head to the opposite side.

Longissimus Cervicis
Attatchments:
Cranial- transverse processes of vertebrae C2 to C6
Caudal- transverse processes of vertebrae T1 to T5
Action: extends laterally flexes the cervical vertebrae


Longissimus Thoracis-
Attachments:
Cranial- transverse processes of vertebrae T1 to T12, ribs 3 to 12 proximal to costal angles
Caudal- transverse processes of vertebrae L1 to L5, the quadratus lumborum fascia and the lumbodorsal fascia
Action: extends and laterally flexes the lumbar vertebrae. Rotator of the thoracic vertebrae

Iliocostalis Cervis
Attachments:
Cranial- posterior tubercles of the transverse processes of vertebrae C4 - C6
Caudal- angles of ribs 3 to 6
Action: extends and laterally flexes the cervical vertebrae

Iliocostalis Thoracis
Attachments:
Cranial- angles to ribs 1 to 6,
Caudal- ribs 7 to 12 medial to costal angles
Action: rotates thoracic vertebrae to the same side

Iliocostalis Lumborum-
Attachments:
Axial- angles of ribs 7 to 12, lubodorsal fascia
Pelvic- medial iliac crest
Action: extends and laterally flexes the lumbar vertebrae, same side rotator of the lower thoracic vertebrae

Muscle Building


The process I used for building the muscles was looking at the photo and rolling out a piece of clay that is bigger than the muscle. I would use a clay knife to cut out a shape similar to the shape in the picture.
While I was building the muscles I learned how intricate the muscles are placed. I was surprised at how muscles interact with one another in the body. I didn’t realize all the wrapping and twisting muscles do around each other.

The frustrating part of the muscle building was figuring out the interaction between the muscles. To get beyond the frustration I had to study the pictures in the book and also look at outside sources (websites) that showed all the muscles on the skeleton at once. This was the biggest problem I had to solve when working with the clay.

Another problem I encountered was knowing how thick to build the muscles. I was able to solve this problem by again looking at the website sources showing all the muscles together. I was able to see all the layers need to fit and therefore could better distinguish how thick or thin to make the muscles. These frustrations helped me to learn the muscles in better detailed because I had to consult multiple sources.

The next clay assignment I plan to take more time shaping and placing the clay on the manikin. I also think it would benefit me to look at the function of the muscles more and try to feel that within my own body. This may help me place a visual with the feeling and understand the muscles better as a whole.

Tips I would share with my blog group members would be to look a long time before modeling and placing on the manikin. It is easy to look at something quick and think we know all the information to do the job. It helps to look at the book and where the muscles start, and stop and then to look at the manikin and find those spots before even touching the clay.

This understanding of muscles will greatly improve my drawing ability of the figure in class. Now that I know how the muscles are laying under the skin I can better see the curves and form of the model. It helps me to realize and remember that skin is thin and it is the muscles that create the plane differences on a figure.

Anatomical resources
Innerbody.com
Google Images Muscular System

Reflection


10 minute drawing

Structure
I think I am getting a strong long axis line in my figure, but I rush into outlining (with longer posed drawings). I need to consciously force myself to take my time with studying the cross contours and not immediately marking my paper. I need to train my hand to do the motions and movement of making a line until I feel I have an exact cross contour. I put the cross contours in the majority of the time but need to be aware more of the angels and observe the model more before marking my paper. I feel that my outlines closed because they are dark and heavy. Even so, I do not think they have a flat coloring-book feel because there is slight variation throughout the figure, but like always could be improved to portray more life.

Anatomy
On this drawing I only drew in the basic form and minimal anatomical landmarks. I included the egg-like form for the rib cage and marked the top of the iliac crests. I also included the sacrum triangle, but going back and looking at my drawing I realized I drew it upside down! My anatomical landmarks are minimal because I need to refresh my memory with everything we have learned before I begin drawing.

Line
I have noticed that I draw heavy and go over my lines again and again until I like them. Once I have drawn my lines and notice how heavy some can be, I remember to go back with my eraser and lighten the lines that are further away from me perspective wise. I also need to work on having variety in line characteristics. For the most part I draw the same width of line. I think I will be able to improve this not only with being more conscious of this when I draw, but also making sure I have a well-sharpened tool.

Composition
I can always improve the use of my picture plane/space of the page. When I dive into a drawing too fast I find myself running out of room because I tend to draw big. If I took the time to plan with light drawn cross contours, I think I would minimize my space problem. In this drawing the first thing I should have done was rotate my drawing pad horizontal to give me a better set up to fit the figure. I think the scale of my drawings compliment the size of the drawing pad because it takes up a good third, if not more of the page.


1 hour drawing

Structure
The long axes lines and cross contour lines are faint but noticeable in this drawing. I think they function well in showing the length and direction of each form. One part I think needs improvement with the cross contours is the figures right leg. To me it looks slightly awkward. My drawing is outlined but I think is more open than my ten-minute drawing because there is more variation in the line value. The drawing does take on a coloring-book type quality because the line thickness is too consistent.


Anatomy

In this drawing you are able to see the egg-like form, the tops of the iliac crest, and the sacrum triangle. It is difficult to include more anatomical landmarks because a lot of the ones we have learned are found on the front of the figure. I also included the spinal erector muscles, but I feel I am still learning where they lay on the back of the figure. I think I possibly could have the spinal erectors going too wide on the back of the rib cage.

Line
The line quality in the drawing is more varied in value. I think there is a good variety of light to dark lines, but I think I could have more light, soft lines and a few less heavy dark lines. I think this drawing struggles with creating atmospheric perspective because I did not make the lines that are father away from me as light as they should be. For example the left arm supporting the models head should be lighter than depicted because of how far away it was from me.

Composition
I thought I did very well with the composition on this drawing. I was able to fit the entire figure on the picture plane and its size is appropriate with the size of the paper. My figure takes up about a third of the paper giving it enough room all around it.

Comparison

When I compared my ten-minute drawing to Amy’s the three differences I noticed were, the figure fitting in space, the angles on the body and line variation. Amy’s figure fit into the space of her picture and the size of the drawn figure complimented the size of the paper. My figure did not fit into the space well because I did not factor in enough space for the extended leg to fit. All would have worked better if I had turned my pad of paper horizontally. I also noticed that the angles of the cross contours and bone structures Amy drew were more precise. I thought with my drawing I did well with most angles, but could have been improved if I had spent more time on studying he cross contours and bone structures. The biggest angel I struggled with was the extended leg. From my view, her leg was going straight out from her side, but my drawing looks flat and awkward. The last element I noticed between Amy’s drawing and my own was the line variation. Amy’s drawing resisted outlining and had a wide variety of light to dark lines and line thickness. Both of these elements made Amy’s drawing appear with more life and have a good sense of atmospheric perspective. I have noticed that I tend to have a hard touch; therefore I have darker thick lines. I would always try to start light, but when I liked a line that I drew I would dramatically darken it to make sure it would be noticed. I usually remembered to include atmospheric perspective after I had drawn because I go back in with my eraser and lighten lines that were farther away from me. Even so, I think I can work on exaggerating the value of my lines to increase the sense of life in my drawings.